
So, you want to dive into the world of custom lapel pins? Whether it’s for your personal collection, your brand, or to start a business, creating your own enamel pins is an exciting and rewarding process. In this comprehensive guide, we’ll walk you through each step of designing, producing, and selling enamel pins.
By the end, you’ll have a clear understanding of how to bring your ideas to life—from your initial doodles to high-quality, wearable art. Not only will you get a grip on the technical aspects, but you’ll also gain insights into pricing, packaging, and selling strategies, perfect for pin enthusiasts or budding entrepreneurs alike.
Ready? Let’s turn your ideas into pins!
Table Of Content
Step-by-Step Process of Making Enamel Pins
Step 1: Create Your Pin Design
Your journey begins with design. The good news? You don’t have to be a Picasso to create an enamel pin. Enamel pins are all about transforming a simple, eye-catching idea into a pin that people love wearing. Whether designing a pin to showcase your brand or creating a trendy item for sale, the essence of your design is crucial.
You can start with sketching ideas on paper or using digital tools. If you’ve got graphic design skills, tools like Adobe Illustrator or Photoshop are great for vector designs. For those just starting, free tools like Canva, GIMP, or Paint.NET are excellent for basic designs.
Not confident in your design skills? Don’t sweat it. There are plenty of freelance designers on platforms like Fiverr and Upwork, who can take your idea and turn it into pin-worthy art for a reasonable fee. Some pin manufacturers even offer design services, making the process easier. Your goal is to develop a clear, simple design that translates well into enamel. Think bold lines, vibrant colors, and clarity in small details.
Step 2: Choose Your Enamel Pin Type
Next up: pin type. Not all enamel pins are created equal, so it’s important to understand the differences between the two most popular types—hard enamel and soft enamel. Each has its unique look and feel:
- Hard Enamel Pins: These are sleek and polished, with a smooth finish. Hard enamel is durable, which gives it a high-quality, professional look. The colors are baked into the metal, and the pin is polished to ensure all enamel is level with the metal edges.
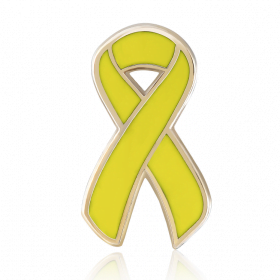
- Soft Enamel Pins: These pins have a textured, raised surface, where the enamel is poured into recessed areas of the pin. Soft enamel allows for more intricate designs, as you can feel the separation between the metal and the enamel.
Want to spice things up? Beyond the basics, you can explore other styles, like glitter enamel, glow-in-the-dark, or epoxy dome for a glass-like finish. There are even 3D cast pins, perfect for highly detailed or sculptural designs.
Step 3: Choosing Your Pin Size
Pin size can make or break your design. While smaller pins (1″ or less) are subtle and understated, larger pins allow for more detail. Your design’s intricacy will often dictate the size. A simple logo or icon can shine on a smaller pin, but complex designs with a lot of fine lines may require a larger canvas to do them justice.
However, size also affects cost, and larger pins generally cost more. Plus, think about wearability. You want your pin to be easily wearable—too large, and it may feel cumbersome for daily use.
Step 4: How Many Pin-Backs Do You Need?
The pin’s backing might not seem exciting, but it’s essential. The backing keeps your pin securely in place, so you need to choose wisely based on your pin’s size and intended use. The most common options include:
- Butterfly clutches: Classic and easy to use.
- Rubber backs: Comfortable and secure, ideal for heavier pins.
- Magnetic backs: Non-invasive, perfect for not poking holes in clothing.
For larger or heavier pins, consider using two pin backs for extra stability. This ensures that your pin doesn’t wobble or rotate when worn.
Step 5: Packaging—Presentation Matters
First impressions are everything, especially when it comes to selling or gifting your pins. Don’t overlook the packaging! While a simple plastic bag might do the trick, upgrading to a more polished presentation like a velvet pouch, custom backing card, or even a branded box can make your pins stand out.
The packaging also depends on where and how you’re selling your pins. If you’re shipping them out to customers, sturdy packaging is essential to protect your pin during transit. For retail sales or markets, an eye-catching backing card with your logo or social media handles can help attract attention and create a cohesive brand experience.
Step 6: Choose a Reliable Pin Manufacturer
Finding the right manufacturer is one of the most important steps in the process. Your pin design is only as good as the manufacturer who brings it to life. There are countless enamel pin manufacturers, so how do you pick the right one?
Look for a company with:
- Experience in making custom enamel pins.
- Good reviews and customer feedback.
- Clear communication—you want a manufacturer who is responsive and easy to work with.
Many people start their search on platforms like Alibaba or Google, but it’s a good idea to request samples from a few manufacturers to compare quality and pricing. Don’t forget to check if the manufacturer can handle your design’s specific needs, whether it’s soft enamel, hard enamel, or additional features like glitter or 3D castings.
Step 7: How Much Do Custom Enamel Pins Cost?
The cost of enamel pins can vary based on several factors:
- Pin type (hard enamel vs. soft enamel).
- Size and design complexity.
- Quantity ordered (larger orders generally result in a lower per-pin cost).
- Plating options (gold, silver, nickel, etc.).
For example, soft enamel pins are typically more affordable than hard enamel. A standard order of 100 soft enamel pins might cost between $1.50 and $3.00 per pin, depending on the size and features. Larger quantities can significantly reduce the price per pin, making bulk orders more cost-effective if you’re selling pins in a business.
Step 8: Confirm and Place Your Order
Once you’ve finalized the design and selected your manufacturer, it’s time to place your order. Most manufacturers will require a deposit upfront, with the balance paid upon completion. Be sure to communicate any special requests, such as specific plating, packaging, or design tweaks.
Keep in mind that the typical production time is 2-4 weeks, but always allow extra time in case of delays—especially if you need the pins for a specific event or launch date. Once the pins are ready, they’ll be shipped to you, and soon enough, you’ll be holding your very own custom enamel pins!
Tips for Selling Enamel Pins
Now that you’ve created your pins, let’s talk business. Whether you’re looking to make some side income or launch a full-fledged pin brand, here are a few tips to help you sell your pins successfully:
- Market your pins online: Utilize platforms like Instagram, Etsy, or Shopify to showcase your pins. Social media is a great way to reach potential buyers and build a community around your designs.
- Price strategically: Consider all costs—manufacturing, shipping, and packaging—when setting your price. Most pins sell for $10-$15 each, depending on the design and market.
- Engage with your audience: Personalize your brand by sharing your pin-making process, design inspiration, and behind-the-scenes content.
Conclusion
Creating custom enamel pins is not only fun, but it can also be a lucrative venture if done right. From the initial design to finding the perfect manufacturer, every step of the process is an opportunity to create something unique. Whether you’re designing pins for fun or to start a business, the enamel pin world is full of potential.
Now that you know the steps, it’s time to bring your creative ideas to life!


